Geofence Analyzers in EarthRanger automatically generate Events when a subject from a specified Subject Group crosses a defined linear boundary on the map.
You can use them to detect:
- Wildlife approaching settlements
- Security teams entering patrol zones
- Vehicles breaching buffer areas
Each analyzer can also trigger alerts if linked with an Alert Rule.
Watch a guided demo: Geofence Analyzer – Guided Demo

Steps to Configure a Geofence Analyzer
1. Define the Subject Group
Subject Groups identify the tracked subjects the analyzer will monitor (e.g., GPS-collared elephants). You can:
- Reuse existing groups, or
- Create a new Subject Group, refer to About Subject Groups article.
To hide a Subject Group from appearing on the map while still using it in analyzers, uncheck the Visible checkbox.

2. Define the Boundaries
Each Geofence Analyzer can include two levels of reporting: Warning and Critical. Configuring both is optional.
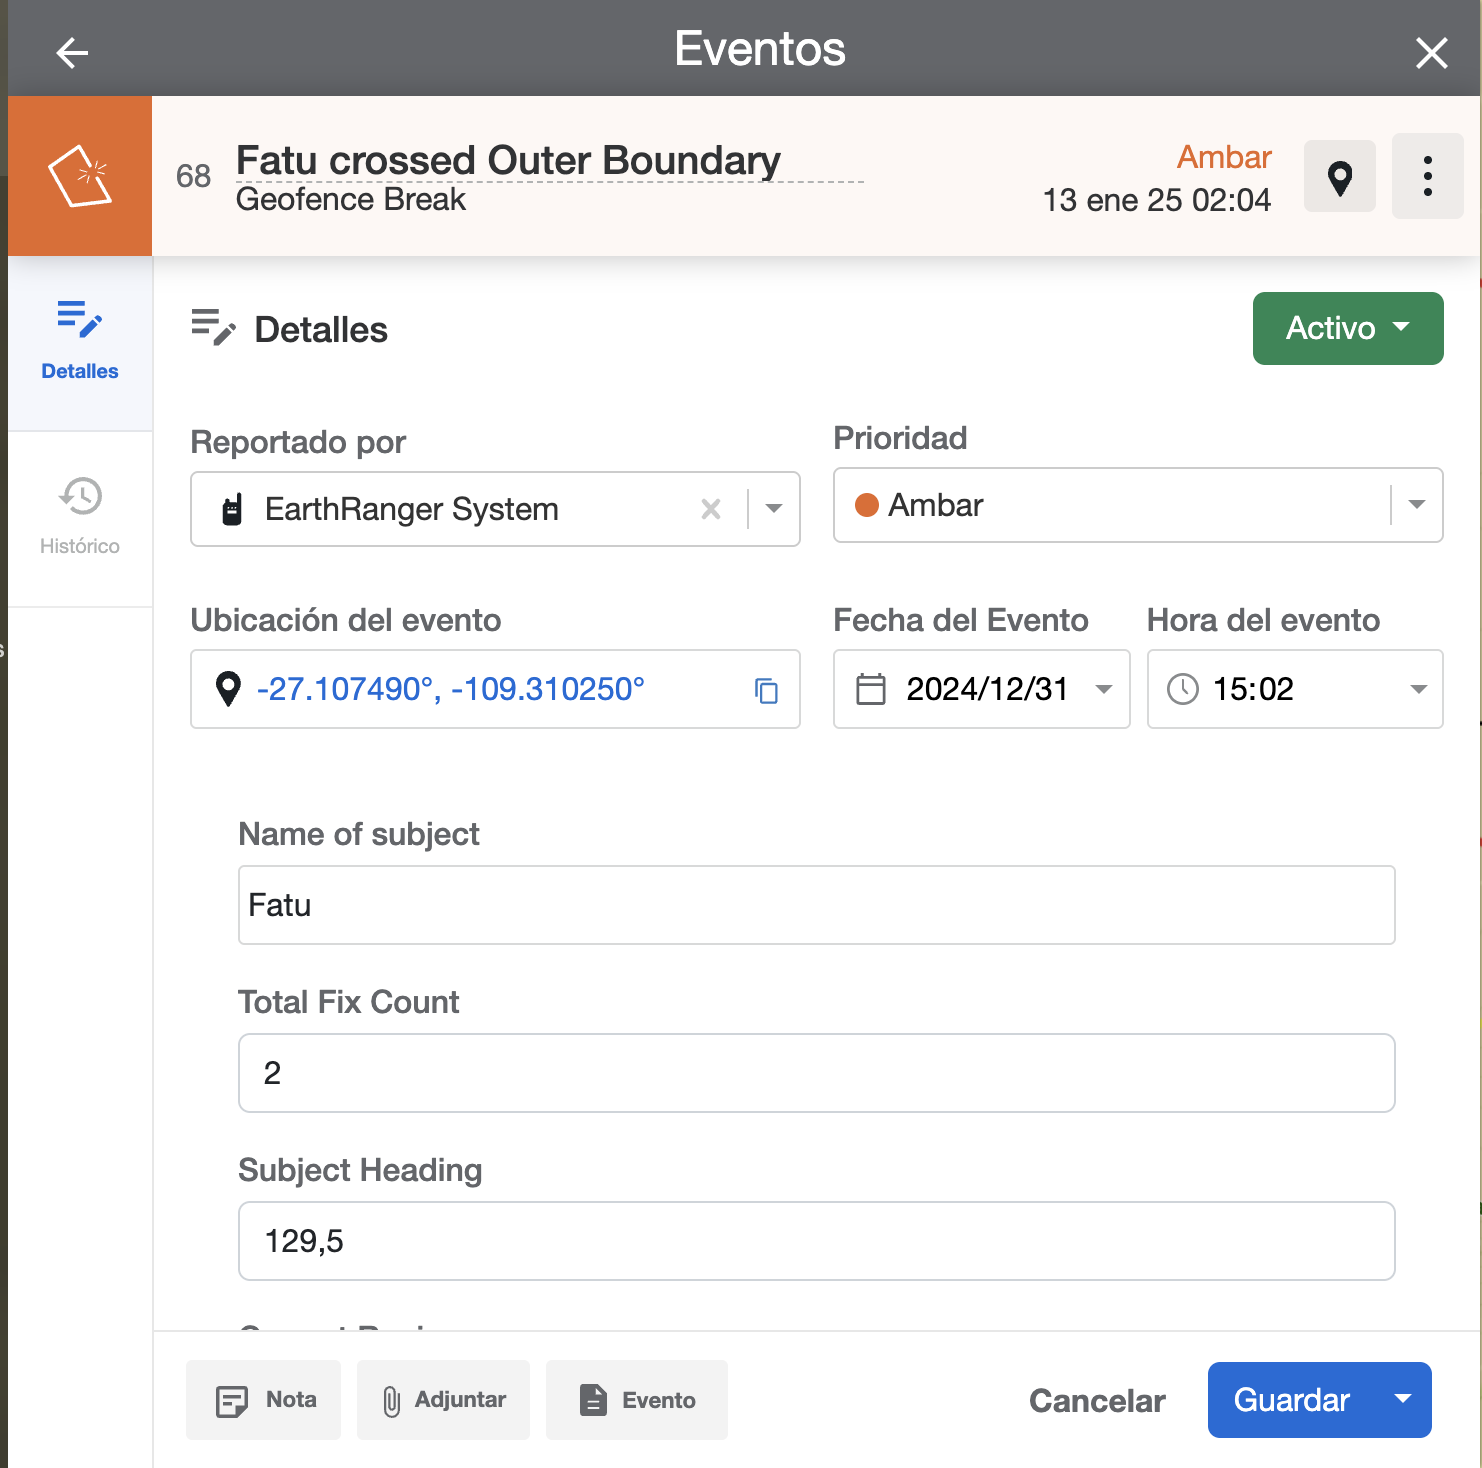
- Warning Boundary: Triggers an Event with Amber priority when crossed.
- Critical Boundary: Triggers an Event with Red priority when crossed.
EarthRanger supports two geometry types for geofence boundaries:
- Line geometry: Detects when a subject crosses a defined line.
- Polygon geometry: Detects when a subject enters or exits an enclosed area.
Warning and Critical boundaries now support both line and polygon geometry. Use line geometry when you need to detect a subject crossing a specific boundary edge. Use polygon geometry when you need to detect whether a subject is inside or outside a defined area — such as a reserve, a restricted zone, or a habitat patch.
Example Configuration
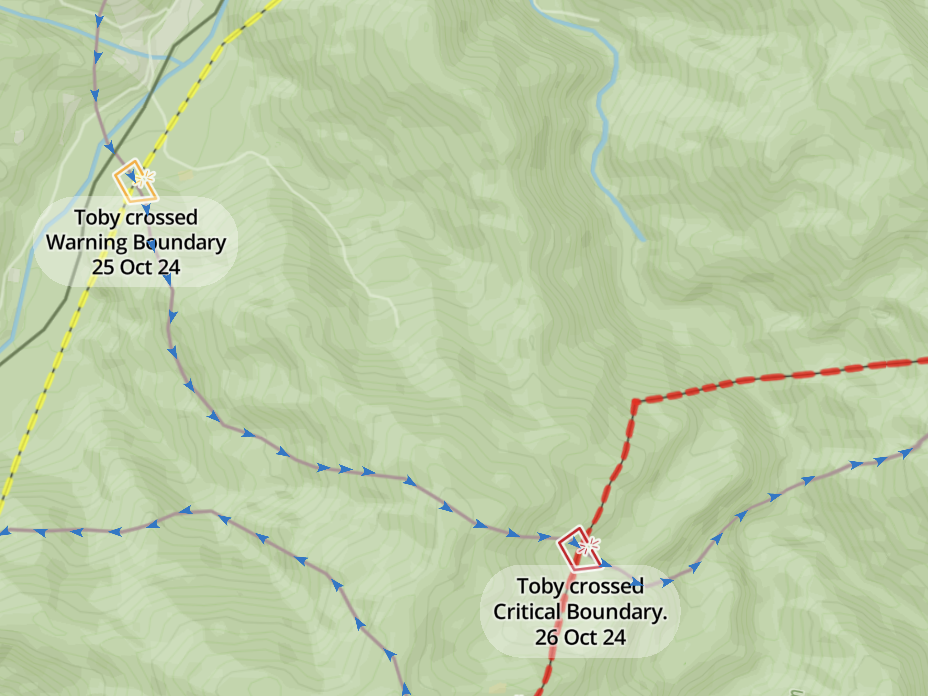

In this example, the analyzed subjects are a group of elephants. The Geofence Analyzer is set up to notify users when an elephant approaches or enters a village.
- The Critical boundary is the village limit.
- The Warning boundary is a buffer set 2 km outside the critical boundary.
When a subject crosses the Warning boundary, EarthRanger generates an Amber priority Event, alerting users that the subject is nearing the area.
If the subject crosses the Critical boundary, EarthRanger generates a Red priority Event, indicating the subject has entered the village.
The Warning geometry defines the region where a subject is approaching the area, while the Critical geometry defines the region where a subject has already entered the area.
3. Adding Boundary Features
You must create or upload the boundary features that act as the geofence. EarthRanger supports two options:
- Upload a file with the boundary features (GeoJSON or shapefile).
- Draw the features directly in EarthRanger.
For instructions on creating or uploading map features, refer to Draw Features directly in EarthRanger.
4. Create the Feature Groups
You need a separate Feature Group for each reporting level of the analyzer (Warning, Critical, or Containment).
Refer to the Feature Groups article for more details on creating and managing Feature Groups.
5. Create the Analyzer
Once the Subject Group(s) and Feature Group(s) are set up, you can create the Geofence Analyzer.
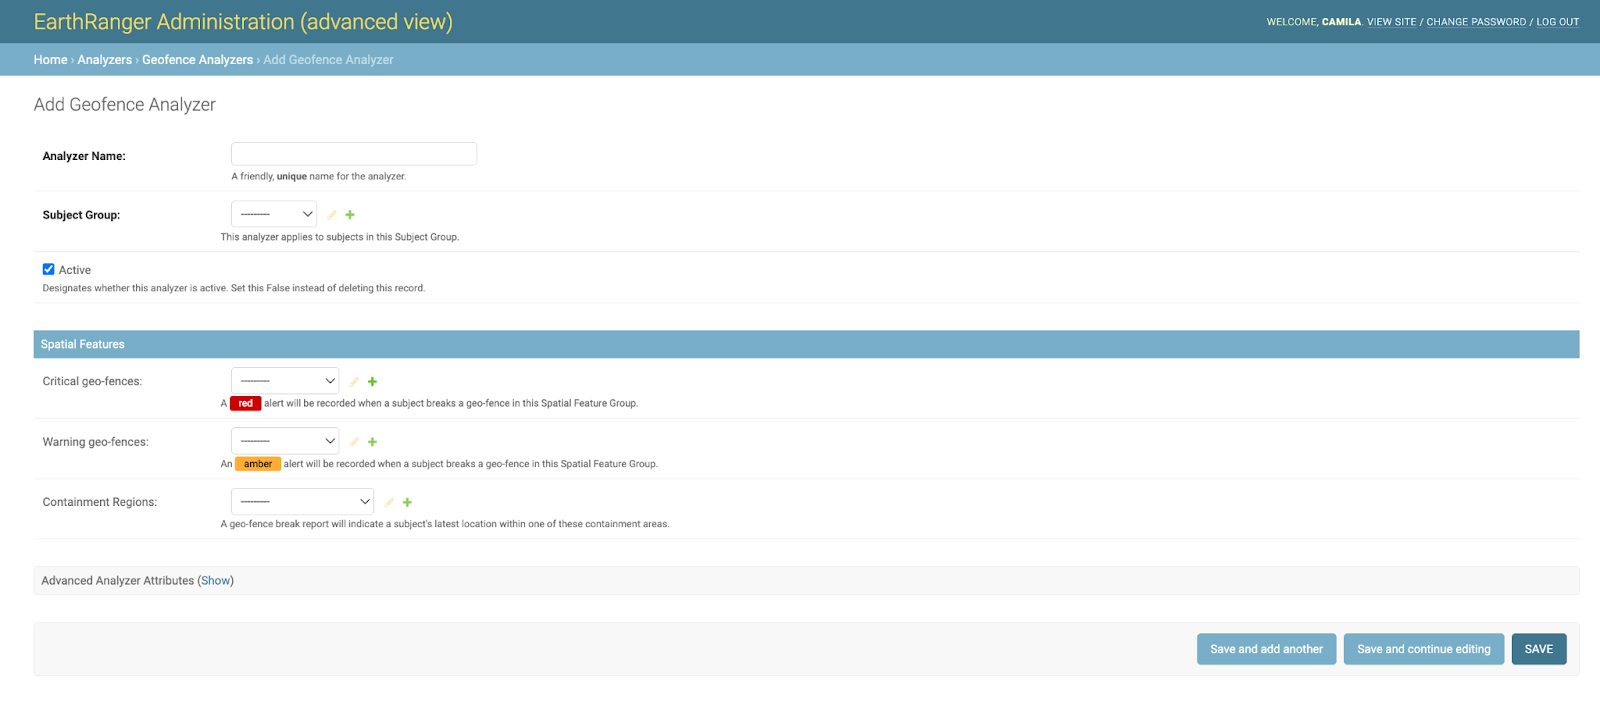
- Navigate to Home > Analyzers > Geofence Analyzers, then click Add Geofence Analyzer.
- Configure the Analyzer:
- Name the Analyzer: Choose a clear, easily identifiable name.
- Select the Subject Group: Choose the Subject Group you defined in Step 1. Each Analyzer can monitor only one Subject Group. If you need to monitor multiple Subject Groups, you can:
- Create a separate Analyzer for each group, or
-
Create an umbrella Subject Group that combines all subjects.
If you skipped Step 1, you can create a Subject Group directly in the Analyzer settings by clicking the green "+" icon. - Set Spatial Features: Assign Feature Groups to each reporting level using the dropdown lists. Feature Groups must have valid geometries:
- Critical and Warning geofences support both Line and Polygon geometries.
- Containment regions require Polygon geometries.
Each reporting level supports only one Feature Group.
If you skipped Step 4, you can create a Feature Group directly in
the Analyzer settings by clicking the green "+" icon.
-
Create an umbrella Subject Group that combines all subjects.
Advanced Settings (Optional)
Analyzer ID
The system automatically assigns an identification code to the Analyzer. This value is not editable.
Trigger on Corner Clip
When enabled, the analyzer will trigger events when a subject's path clips a corner of a geofence — that is, when a subject goes out and back in without an observation point being logged outside the fence. It will create a geofence event for every point where the subject's
path crossed the fence. Enable this setting when boundary crossings must be caught as precisely as possible. Disable it when you want to limit alerts to confirmed crossings with a recorded point outside the boundary.
Feature Group Filter
When set, events will only be created for detections that occur within the spatial features of the selected Feature Group. Use this to limit detection to a specific geographic area.
Analysis Time Frame
The Analysis Time Frame determines how far back in time the Analyzer reviews track data to generate Geofence Events.
When EarthRanger receives new observations (tracking points), the Analyzer reviews only the data within the configured time range. This is critical for devices that store data for a period before synchronizing with EarthRanger. For example:
- If a collar stores data for 7 days but the Analysis Time Frame is set to 48 hours, EarthRanger analyzes only the most recent 48 hours of data when it is uploaded.
- To ensure the system detects geofence crossings during the full 7-day period, set the Analysis Time Frame to at least 7 days.
Note: Geofence Analyzers use linearly interpolated data to determine when a subject crosses a boundary. The system interpolates between the last observation outside the area and the first observation inside it. Both points must fall within the Analysis Time Frame. If the last observation before the crossing is outside the configured time frame, no Event will be generated, even if the crossing occurs within the time frame.
Quiet Period (HH:MM:SS)
Overrides the system-level quiet period for this analyzer. During
the quiet period, the analyzer will not generate events even if a
qualifying crossing is detected.